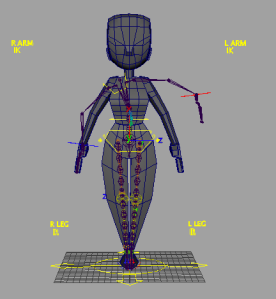
During the assets modelling stage Matt was able to produce a blocked version of Kimmy in order for me to jump onto rigging at a early stage.
Model: Matt McDyre
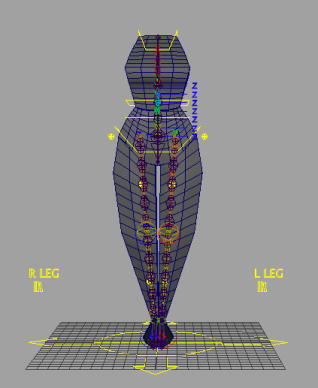
Legs
This early version of the rig would be use to work out any bugs in terms of structure and see where problems with model deformation might arise. After studying the model and character sheet i thought the most problematic area was going to be the legs due to there shape so i began from there.


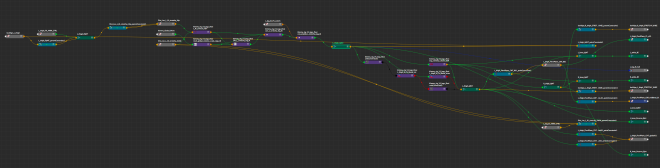
I created my node outline for the rig then began. This outline allows for a clean workflow for myself as well as creating a non destructive place to store my work.
 I began with a simple 3 joint chain for the legs and created a separate chain for the feet. The legs are the typical IK/FK joint setup using blend colours nodes to drive the Bind chain. As thought the knees were a particular area of issue due to the block shape and volume. After creating this chain i decided i should look into implementing my method i had tested previously on the arm by using the Bind chain to drive a flexi planes which in turn would deform the mesh to bend in a more cartoon/stylised way.


The flexi plane itself is created through a curbs surface which is driven by a series of non linear deformers and blend shapes, this then has follicles attached to the surface that drive the joints seen above. A flexi plane would have to be connect to each limb such as thigh then knee in order to get the freedom required for the animator to reproduce the bendy limbs we wanted.

I first saw this method in the Digital tutors video series. This flexi plane system allows for added control of the knee to give a knee which has a free transform ability as pictured above. The legs included a squash and stretch ability on both IK and FK for any cases that might need it, such as falling from a great high or being pulled by her legs.


This setup was created through a digital tutors tutorial that showed me how to use the node editor to develop a stretch effect on the legs through the IK or FK joints
 I then allowed the bind chain to follow the scale of the IK or FK joints through a expression.

In the end this is how my leg bind chain ended up looking like within my node editor.

The feet for the rig was developed as a locator driven foot roll with a built in FK control to allow for additional tweaking if required. This was developed through the hierarchy of Bind joints. This was a decision made by myself to allow the animator as much freedom as when animating and ensure they can easily adjust a pose on the feet if required.


The main issue i had with this setup was the fact that i had inverted the foot roll so that a negative value produced the most used result when animating. This meant i had to do some tweaking with clamp nodes in order to develop a positive value.
Arms
After learning some valuable techniques when developing the legs the arms were built almost the same way in order to have the same capabilities as the legs. This included flexi plane bend controls, IK/FK blend and stretching, elbow transform control and due to the fact that flexi planes were the made driver of the skin the counter twist was taken care of for both arms and legs.
The clavicle joints and rig were built as a simple rotation based control to avoid any issues i might have with IKs this seemed to be a more time efficient way than creating a transform based clavicle.
Torso
After completing the leg and foot setup i moved onto developing a spine rig that would also for some nice fluid animation. i decided to create a IK spline rig that is controlled by a underlying FK spine which i learnt from the maya learning channel in previous years of study.
Creating the joints in the centre of the spine was made a lot easier due to a script i was able to find on digital tutors and tweak to fit my needs. The script allows me to split the joint into equal sections.

The spine has built in squash and stretch capabilities which i created through the node editor.

Again this was developed to make the animators life easier when working so they did not have to worry about preserving volume in her torso.
Ribbon Arms/Legs
One of the things the team talked about was trying to be able to make Kimmys arms create a wave effect if required. In order to achieve this i found a useful tutorial on youtube where a similar system is created.
From this video i was able to learn how to create a “Ribbon Spine” and implement this system in a characters arms. I created a nurbs surface with a similar system to the flexi plane of follicles and joints which is then skinned to the flexi plane joints. These surfaces are then duplicated and used to create blend shapes that allow for sine waves to be attached to them. This then creates the arm wave without restricting the underlying arm structure of the rig so that the arm can still be animated as normal while waving.

In the end the arms/leg hierarchy is as follows:
IK joints – FK joints
Blend Colours
Bind Joints
Flexi Plane Joints
Ribbon Spine
Final Deformation

Model: Matt McDyre
Model Upgrade
During the time between me having the main structure built and creating the hand rig Matt finished the final model for Kimmy so that is what i moved onto working with.

link to character modelling process by Matt McDyre
http://mattmcdyrefinalyearblog.tumblr.com/post/155807601507/designing-kimmy
Hands
For the hand controls there was a good bit of back and forth between myself and Matt McDyre as to what he would like in terms of animation controls. We decided on a triple layered system for the fingers and a FK system for the thumbs. The fingers would have a master controller that controls all fingers through a setup of set driven keys, there is then a setup of single finger controllers that will move through set driven keys. Finally there is a FK setup for each finger joint for fine tuning each pose within the animation. It is important to ensure that each layer of control is able to work in conjunction with on and other when animating to allow for the team to work in a efficient manner.


Below shows the control system is driven through the hierarchy using DRV joints for the set driven keys.

The outcome at the end was something i was very proud of and would work on refining to implement next seamster, i have began developing a script to automate the create of these DRV and bind hierarchy to increase productivity.

Testing
During the process of rigging Kimmy it was a constant back and forth between myself and the rest of the team, sending them versions of rigs for them to test out and we could see what needed changed. This allowed us to fix issues before they became a real problem while animating.
early test
Animation: Matt McDyre
final test
Animation : Hannah Loughridge
Animation: Matt McDyre
Skinning
During the skinning process i managed to get chatting with Greg MaGuire and he told me about the weight painting plugin he uses when skinning a character called NgSkinTools. This came in extremely useful when painting the weights on things such as the fingers and wave weights. The tool uses a better algorithm for smoothing out vertex weights and also allows for non destructive weight mirroring even when the character isn’t in a T-pose.


The ability to have weight layers also proved to be a amazing feature when working on areas such as the clavicles.
During the skinning process we were testing the rig and how it move and a issue popped up due to the shape of Kimmys upper half. This meant Matt had to do some model redesigns and id have to re-skin. Luckily i was able to export the weight maps from one model onto the other with minimal effort required in touching up certain areas.


Old New
Corrective Blendshapes
Due to the shape and proportions of Kimmy i found it challenging to achieve the level of skinning i would of liked, therefore there was a lot more corrective shapes then first thought when finishing the rig. The corrective shapes were built with the aid of the extract delta plugin for maya. These were then mirrorED with another script i learnt how to create through digital tutors.


Above is what the deformations where like before the corrective shapes were applied. Below is the result of the shapes.


Above is a example of the amount of corrective shapes that Kimmy had applied to her target shape and a example of the results. The blend shapes allowed for a nice silhouette on the shoulders and hips allowing for a better flow of lines. This flow would be important when try to replicate how someone might draw a cartoon character.
The Face
For are story we wanted Kimmy to be mute the entire time so in order to portray emotion we needed to have a solid facial rig. After working closely with Matt McDyre and talking about his time animating in BillyGoat we thought the best idea was to use a blend shape driven rig for Kimmy and he preferred to animate on curves that were offset from her face rather than being on the face itself.
After my work on the hands i know how important a tweak rig, such as on the finger joints, can be when trying to strike an important pose therefore i decided to try and implement that within Kimmys Face.
The Design Decision was made to make Kimmys eyes and glasses be almost the same and that her glasses would move rather than her have brows to deform to cause expression. Therefore the glasses and pupils where the focus for my main blend shapes. The glasses had been modelled curved, to get a nicer set of blend shapes i decided to straighten them out then deform then with a lattice later on. This lattice would have to be used to drive the transformation of the pupils swell as then needed to travel across a curved surface.


Above is the final result of the blend shape rig for Kimmys face. It is a setup of several set driven keys and curves in order to create the final deformation on the skinned mesh. the deformations are then put through the lattice as seen above to ensure the nice curved shape.
Once the blend shape side of the facial rig was complete i moved onto added a system of tweak joints to the glasses to allow for more subtle movements if required by the team. Though the node editor and some hierarchy tricks i was able to develop a system of curbs surfaces that control joints on the face. The curbs surfaces follow along with the vertex they are assign to even when a blend shape has deformed the face, the joints on the other hand do not move. The joints one move when the tweak system is interactive with allowing the joints to hold their weight on the glasses while a blend shape is being deformed and then moving the tweak control to fine tune the pose.

Below is a test animation completed with a early version of the facial rig to see when could be achieved.
Animation: Matt McDyre
Once the glasses and eyes were completed i moved onto developing a system for creating a mouth rig for the textures we had. Hannah Turkington had been playing around with the idea of layered shaders and a texture sequence in order to drive a projected mouth on top of Kimmy. I took what Hannah had been working on and added it into the facial rig with some new controls.


Through the texture placement i was also able to transform the mouth position on Kimmy to allow for some different results.
The Final Rig
